Fixing Ceramic Wall Tiles
You are here:
Home Page > Decorating A Loft Conversion > Fixing Ceramic Wall Tiles
As long as the preparation and tools are right fixing and using wall tiles is a task that most of us should be quite comfortable with.
And, once the job of choosing the best ceramic tiles for the job has been done you are ready to begin the preparation.
Preparation
If you are working on a newly plastered room or, for example, tiling a loft conversion then you are on easy street in regards to preparation as there isn't anything to do.
Tiles need to be hung onto smooth and flat plaster and a new built will obviously provide that.
However, If hanging the tiles onto a previously tiled wall then the existing plaster must be smoothed out with all cracks and gaps been filled before work can begin.
This is tedious and time consuming work but it has to be done if you want to achieve good results.
Adhesive And Grout
It should go without saying but if you are tiling in a bathroom or around a sink than you must use a waterproof adhesive and only use those that are specially formulated for ceramic tiles.
Waterproof grout should also be used and can be bought either as ready mixed or as a powder.
The former is much more convenient to use. You can also buy a specialist material that can be used as both an adhesive and as a grout.
It used to be the case that grout was white and that was that. Nowadays though coloured grout can be purchased to match the colour of the wall tiles you are using which can look quite pleasing.
Hanging Or Fixing Ceramic Wall Tiles
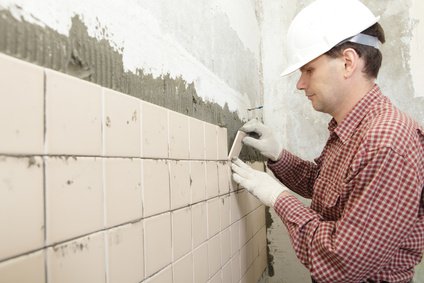
It is best to start fixing the tiles from the bottom of the wall working your way row by row to the top.
It is vital that the first, or bottom, row of the tiles are placed accurately to ensure a straight horizontal line.
Once this base line is established it is easy to keep the rest of the tiles straight.
Establishing The Baseline
The best way to do this is by using thin timber battens.
Fix a horizontal batten one tile depth plus an allowance for grout up from the skirting board or worktop/sink and use a spirit level to make sure it is straight.
Temporarily fix the batten to the wall using long nails - don't hammer the nails right in they need to be fixed loosely so they can be easily removed.
Fix a vertical batten so that its inner edge marks the line of the last whole tile you will fix.
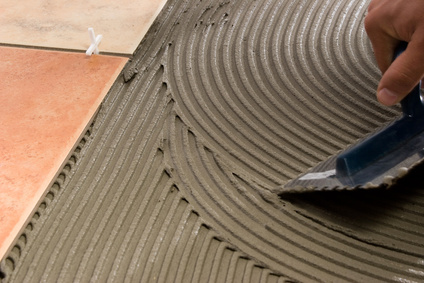
The next step in fixing ceramic wall tiles is to apply the adhesive using a plastic or metal spreader.
Only apply a few tiles width of adhesive at a time.
Take the first tile and put it firmly in place where the horizontal and vertical battens make an angle and then work along the batten to the left inserting spacers between each tile.
Keep working upwards fixing only whole tiles, ignore any obstacles such as windows at this point, and once all the tiles have been fixed remove the battens. Then fill in the lowest row of tiles.
Once this process has been completed you need to fill in all the gaps at the edges and around obstacles by cutting the tiles to fit and pitting them in place.
Grouting
The next and final process of fixing ceramic wall tiles is to apply the grout.
This should be done only after leaving the adhesive to dry for at least 12 hours and after removing the spacers.
Follow the manufacturer’s instructions on preparing the grout and then apply it between the joints of the tiles by pressing it firmly into place using either a small spreader or a sponge.
Make sure any excess grout is quickly removed using a clean sponge and then use a grouting tool to compact the grout. Leave to dry and then go over the tiles with a clean cloth to finish off.
For more info see the related pages below
The Lowdown On Cutting Tiles Accurately
Fixing Ceramic Wall Tiles? Make Sure You Choose The Right Ones


Be Prepared!

Latest Headlines

Search This Site

Take Me Home!

Latest Articles
-
What Is Vermiculite Loft Insulation?
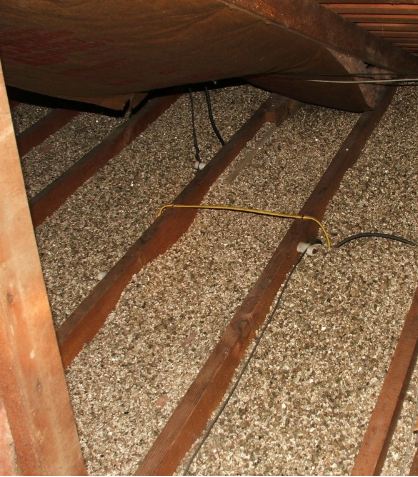 Vermiculite Loft Insulation is an echo-friendly alternative to traditional insulation materials
 -
The Loft Water Tank Moving And Repositioning
The old loft water tank will need to be moved if the roof space is being converted into a habitable room -
Structural Calculations For Loft Conversions
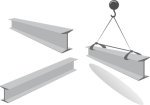 Structural calculations for loft conversions are of course hugely important to ensure safety and that the proposed plans meet building regulations